Showing posts with label do it yourself. Show all posts

Thursday, March 13, 2014

DIY Earring Display Idea

As you know, I have been actively preparing for my fair which is coming up in 2 day ( holy **** !!! ). By not only beading my life away but also pretty much living between Michaels, A.C. Moore, Hobby Lobby and Joann's I have been actively trying to "broaden" up my collections and finally get everything ready. As a result I decided to put Mike to work, yet for another DIY project of mine.

Here we go!

To begin the project you will need:
 - 1 wooden picture frame
 - 6 - 8 one inch , skinny nails ( depending on how many rows you would like to have within your frame.
- hammer
- a drill

_________________________________________________________________________
Step 1: Take your wooden frame, and measure where you would like to place your earring lines. Mark those spots with dots. These spots will be helpful to you when you place the nails in the appropriate spots. 


Step 2: Have your nails ready. I used 6 nails and they were the skinny type with a pretty wide head. The wider the head of the nail, the easier it will be to tie your thread around it. 


Step 3:  Grab a drill !


Step 4:  Drill very small holes in the spots where your nails will go. Make sure you drill straight down, otherwise your thread lines will be cricket. Then, take the hammer and hammer the nails into the holes. Depending on the type of nails you have you may completely skip the drilling of the holes. Make sure you leave about 5 - 3 cm lead room on the nail. 


Step 5:  Take your thread and tie is around the nails. Make sure the thread is very snug against the nails. This was the most trickiest part of the process. Since my nails's head was not wide enough to hold the thread in place. I used crazy glue to secure the thread in addition to tying it around the nail. 
You may need to do this a few times to get the hand of it. 


Step 6: Pick your background. I used "beach theme" paper to compliment my collection at the fair. 


Step 7: Scotch tape or hot glue the background paper to your frame. 


Step 8: Flip you frame, put in on a decorative stand and put some earrings on it - you are all done !


This was a super easy project to do and took less than 20 minutes. The frame looks great and total cost of it was: 5.99$ - which was what I paid for the frame. Totally affordable and looks great!


       Please cheek back on Sunday for pictures from the craft show and another blog post !

- A. M.

Sunday, March 9, 2014

DIY Price Tags Idea

      My first craft fair is only a week away and this is officially a "panic" mode for me. Today, the entire day was spent on arts and crafts projects: I made Mike ( my husband ) make me a sign for the fair, drilll holes in the table, put nails into a picture frame and etc while I was filling existing orders and trying to wrap my mind around what I still need to do.
      As I was setting up my table, I realized I had these white, plain, boring price tags and I needed to do something about them. My whole table set up is very "beachy" and "summer" like and then there are these PLAIN white price tags. I had to do something about them…
     Suddenly light bulb.  I must go to Michaels ASAP !  So, I made a run to Michaels and bought colorful duck tape. I bought 4 different rolls. Each one cost me about $1.50. When I got home, I began my "duck tape" production and here is the outcome.


To make these fun price tags here is what you will need:
1. Scissors
2. Colorful Duck Tape
3. White / plain price tags. 


Next, you take the white price tags, and you wrap them into the duck tape until they are covered from both sides. 
After, you take scissors and cut around the price tag to off cut excess tape. 


The whole process is super easy and takes less than a minute to do!

As a result you get these awesome, fun and colorful price tags that are surely better than plain white ones.


Hope you enjoyed this short tutorial and will use it in the future :)

Check back on Wednesday for a tutorial on how to make your own earring stand. 

:) - A.M.


Tuesday, March 4, 2014

100% Handcrafted Show In Robbinsville NJ

       I finally applied to my first craft show.  Now, I am not a big "craft show goer" person and have only been to a handful of shows myself, I figured... Eh..What-a-hell. So I researched some local craft fairs in the area and applied to the one in Robbinsville High School, NJ on March 15. To my surprise, even without any previous craft fair experiences I got in. Hence began the craziness of trying to get everything together. This week I wanted to post about some craft fair ideas I found all over the internet.
      So, here we go...
_________________________________________________________________________

I found an amazing article on another blogger's website about helpful tips and insights when it comes to going to a craft show. Here are some of the most helpful hints:

The best investment I ever made for vending in general was a canopy (mine is an entry level EZ-Up) and a lightweight, plastic, folds in half table. If you are going to these events by yourself, do not underestimate how hard trudging across a field carrying your stuff is. A light table will make a big difference over a huge plywood folding table. And the canopy? Saved me in rain (yes, it rained during one of my fairs, ugh) and blistering sun. It also gives your set up a much bigger "presence." Eye catching is the key."

"Which brings me to your set up. A professional "look" will do wonders bringing people over. Make it cohesive, work your branding, have signage, and let the product speak for itself. Too many props will confuse the buyers, a totally plain table with just product looks "flea markety" - keep your set up decluttered but not so fussy that no one wants to touch your stuff. And SMILE! No matter how nice your product and professional your set up - if you're a grumpy puss, no one will approach you!"

" While this should be common sense - I didn't do this well. RESEARCH what the craft fair is like. How many people attend each year approximately? (That's the ONLY question I remembered to ask). How many years has the fair run, is it a longstanding tradition in that area, or is this it's first year? Is it handmade items only - or is it also an antiques market? What I most importantly forgot - WHO ELSE WILL BE THERE vending - specifically - how many other vendors with your type of product (for me, jewelry, which, I'll say is particularly cut throat). Are companies allowed (say, like Lia Sophia)? All these factors will help you determine if that vending fee is worth it."


To read the remaining of the article, please click HERE.

_________________________________________________________________________

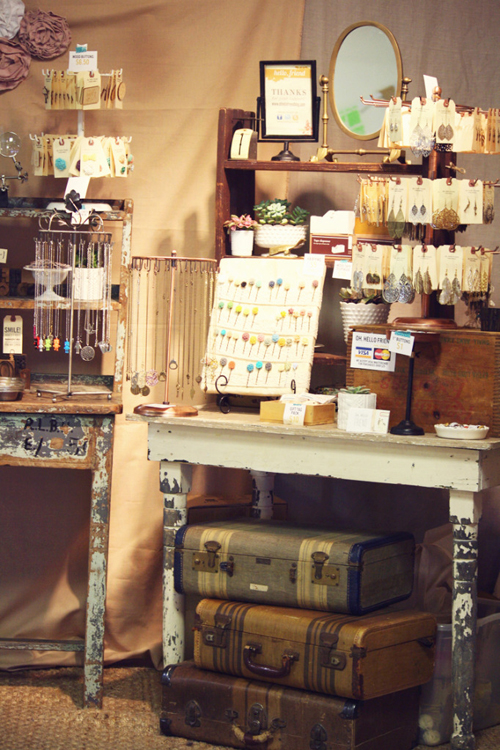
I really enjoyed some of these displays and set up ideas I saw on Pinterest:


Pretty neat vintage set up.


A sample booth display


DIY picture frame jewelry display


DIY necklace display 


Very neat earring display idea. 

                                           
                                                        Awesome display idea.
_________________________________________________________________________


Here is another 10 tips I found here that I thought were super helpful for a first-time-crafter. 


10 Tips for a Great Show:

1. Be friendly! Smile, make eye contact, I usually ask a question like “Hi, hows it going?”, if you like their bag, top, dress or whatever, compliment them.

2. Don’t get overly chatty, you don’t want to miss a sale or turn off a customer because you are in a lengthy discussion with someone else. This is especially important at check-out, don’t take too long or someone might not want to wait, do your best to be quick, or have a helper.

3. Have a display that best highlights your product. Solid color back drops, table cloths, containers, you don’t want your display looking too busy. You want the product to stand out. Fill out the booth but don’t crowd it. Put overstock behind or under the table and replenish as needed. Have a chair, but not one of those big sloppy camping chairs, they look messy and take up a lot of space.
4. Practice your booth set-up. Even if you are a seasoned veteran, you should always have a plan before you show up so that setting-up isn’t too stressful and you’ll be ready on-time.

5. Brand your packaging, have business cards, have a mailing list, have a memorable booth that people will keep talking about after the show.

6. Have a mirror! If you sell anything wearable you’ll want a good mirror, big enough that people don’t have to ask for it.

7. Work on something during the show, don’t read a book! If you are working on something, share the technique with your customers, don’t get into a craft zone with your head down. Having your head down is a definite turn-off to customers.

8. Have enough change and if you take credit cards, put a visible sign saying you accept cards. A lot of shoppers assume everyone is cash only and when they run out they’ll stop buying. Accept credit cards, you’ll make more sales. (Simple CC solution is the Square card reader).

9. Dress nicely, wear make-up. Dress like what you want to be, a successful crafter. Wear your product.

10. And lastly, arrive early! Pack the night before, get plenty of rest, eat a good breakfast. Shows can be like marathons, be prepared.
___________________________________________________________________________________
Check out my first craft show on March 15th, 9 AM - 3 PM
In Robbinsville High School, NJ


                                       Check back soon for another blog post on Wednesday, March 5th !

Wednesday, February 19, 2014

DIY Anchor Bracelet Tutorial


       Here is another tutorial I found on Joann's Website. I thought it was an interesting bracelet, but again, I wanted to change a few things about it. What is pretty cool about this bracelet is that you don't have to have specific beads for it. You can pretty much work with what you've got. You can also recycle beads or use leftover beads from previous projects.  I hate the fact that the website gives you step- by-step directions but without any visuals. Unfortunately, a lot of people ( like myself ) are strictly visual people and would rather LOOK at step by step directions versus reading them. This is why I wanted to create another visual tutorial. Here is the original design:


The directions said the following:

SUPPLIES & TOOLS:

  • Cousin®:
    6mm Metallic Blue Rounds (1 pk)
    4mm Blue Bicone Mix (1 pk)
    Blue Glass Bead Mix (1 pk)
    Silver Metal Anchor Toggle (1 pk)
  • Silver crimp tubes (6 pc)
  • Silver .45mm 7-strand beading wire (30")
  • Needle nose pliers
  • Crimping pliers
  • Wire cutters
DIRECTIONS:
1. Cut (3) 10" lengths of beading wire.
2. Using crimp tubes, attach each wire to a toggle end.
3. Thread 6-1/4" of beads onto each strand. String beads staggering sizes and styles.
4. After each strand has the same overall length with beads, loosely braid the three strands together.
5. Use crimp tubes to attach each wire to the other toggle end.
6. Trim the excess wires.
_________________________________________________________________________________
My own directions:


Step 1: Gather the beads you would like to use for the bracelet. I used some of my old and left over beads for this bracelet. I also had a small anchor charm which I used as a closure ( the anchor doesn't have to be as big as on the original photo ).

Step 2: Cut 3 12 inch strings ( I used standard beading silk thread ). You can use wire or thread - it is up to you. 

Step 3: Put a stopper bead on one of the strings before you begin your work. 

Step 4: Start putting your beads on the first string. I suggest using some sort of pattern. I did try to use "random" beads in the beginning, but it just did not look right.

Step 5: Repeat step 3 and 4 with the other 2 threads. You can follow the same pattern, or create a different one for each string ( like I did ). 
Please remember to put a stopper bead at the end of each thread, just like you did in the beginning. 

Step 6: Take all 3 threads and go through the needles eye with all 3 threads. Make sure your project is aligned and all strands are at the same place / location.  


Step 7: Take 15 - 25 seed beads and put them onto the needle. Pull through the first seed bead in order to make a closing loop. The reason why I say to take 15 - 25 seed beads is because you want to create a loop big / small enough for your anchor. 

Step 8: After you have pulled through the 1st seed beads, tie your strings into 2-3 knots, secure the thread with crazy glue / cement and cut off the strings. 

Step 9: Pull up your beads strands so that they are tightly placed against your loop. 

Step 10: Pull the other 3 threads through the needles's eye. 

Step 11: Attach your anchor and pull through one of the white bead stopper beads. 

Step 12: Secure your thread by tying  3 knots right after the stopped bead. Use some crazy glue / cement to secure the thread and cut the remaining thread off. 

And here we have it !


Check back soon for more tutorials and other useful information about handcrafted goodies !!


Sunday, February 16, 2014

DIY Stretch 3 Layer Bracelet Tutorial

      I discovered Joann's store pretty recently, when my co-worker mentioned that they offered 15% teachers discount on your total purchase. I checked it out. And, I must say, I was pleasantly surprised. Their bead selection wasn't a top notch one, but they had unique bead strands and 30% off sale on all of their beads ( big plus in my book ). They also offered a variety of discounted jewelry organizers and tons of supplies for creating wire wrapped jewelry ( one of my latest obsessions ). What I really liked is that they had awesome buttons. Vintage metal ones and plastic ones and whatever you wanted ( which I am crazy about for my leather wrap bracelets ). I bought a bunch of stuff for a very reasonable price and, like a kid in a candy store, got to work when I got home. Recently I was browsing their website and stumbled upon "Craft Ideas" section. They had 800 results from DIY jewelry projects. I browsed through them and found one that I wanted to try to make at home.

The project was called "Denim Blue Stretch Bracelet"  and it looked like this:


The directions said the following:

SUPPLIES & TOOLS:

  • Cousin®:
    Dark Blue Bead Mix (3 pk)
    8mm Matte Blue Beads (1 pk)
    8mm Blue Pearls (1 pk)
    Silver/Crystal 3-Strand Spacer (1 pk)
  • .8mm clear stretch cord (48')
  • Wire cutters
DIRECTIONS:
1. Cut (3) 12' lengths of stretch cord.
2. Thread the following pattern onto each cord: (8) dark blue beads, through the hole of a 3-strand spacer, (8) matte blue beads, through the hole of a 3-strand spacer, (8) blue pearls and through the hole of a 3-strand spacer.
3. Tie each cord in a double knot and trim the excess. The knots should be hidden against the 3-strand spacer.
4. Cut a 12' length of stretch cord.
5. Thread on (6) blue pearls, (6) matte blue beads, (6) dark blue beads and (6) matte blue beads.
6. Tie the cord into a double knot and trim the excess.
_________________________________________________________________________________
After reading the directions, I wanted wasn't too convinced I wanted to use the same exact colors as pictures, so I have decided to make the exact same bracelet, but use different colors. 
Here are the steps:


Step 1: I used stretch magic, pearls, Swarovski Elements 3 hole divider and scissors.

Step 2: Cut 3 12 inch stretch magic cords.

Step 3: Add your first row of beads ( pictured 9 beads ) but I actually ended up using 10. 

Step 4: After you added first 10 beads, add the divider. 

Step 5: Follow steps 3 and 4 until you have 30 beads and 3 dividers.

Step 6: Tie the stretch magic on double sailor's knot. ** See Below **


Step 7: Cut the remaining of the stretch magic off. 

Step 8: Add the second row of beads in a similar manner as steps 3, 4, 5

Step 9: Tie the ends of the strench magic together. ( Refer to the picture )

Step 10: Cut the remaining stretch magic off. 

Step 11: Add final, third row in a similar manner as the previous two. 

Step 12: Your bracelet is ready to wear !


This design was very easy to make and required very minimal effort and supplies. This is definitely a beginner bracelet, but despite its simplicity, it looks classic and well put together. It took me 23 minutes to put together and here is the final outcome:


Check back soon for more tutorials and beading articles !